


Overview
This document offers a brief overview of the updates and changes that you can expect to see in Version 10.1 of the Desire2Learn learning management system at Michigan State University. Click the link below to download a printable version.
Highlights
According to the company, that learning environment has been updated with these features:
- Video Note allows the user to use a webcam and then drop a video into the course content;
- Universal Drag and Drop File Upload simplifies the addition of files into course content from external sources (such as the user's desktop);
- The ability to create new material, such as assignments, quizzes, and discussions inside content without having to do it from within a popup or navigating to another function;
- Inline document conversion and rendering for Microsoft Office and PDF files;
- A beefed up HTML editor that allows for insertion of audio and video in place;
- Quicker access to restrictions and date management;
- A new class progress dashboard to provide student progress at a glance for instructors; and
- A revamped User Progress function that improves on visualizations and streamlined navigation among users, courses, and tools.
The first time you log into Desire2Learn 10.1, you will notice some user interface changes that have changed from version 10 to 10.1, while other tools are brand new.
Highlights – Content
One of the biggest changes in 10.1 is to the content area of your course. You will no
longer see the four tabs and dropdown options like you would in 10.0:
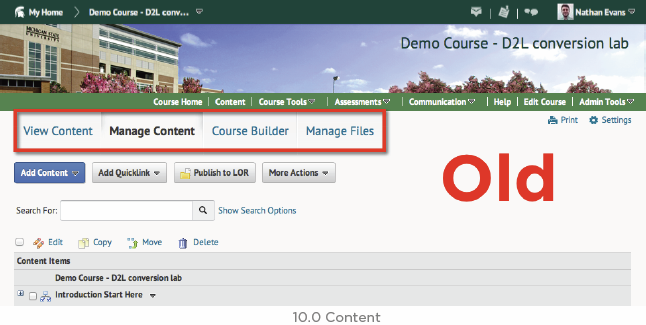
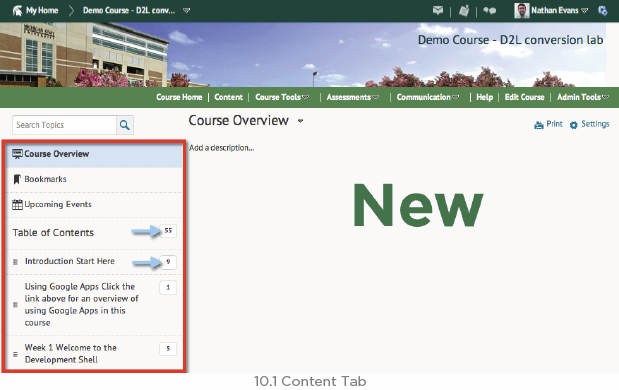
Instead, they have been moved to new locations in 10.1. However, all of the same
tools are still accessible. Along the left is a tab that contains Course Overview,
Bookmarks, Upcoming Events and Table of Contents which cannot be removed.
A. Publish/Draft: You can now choose to mark your item as Published or Draft.
Students will not see Draft items. Note that files can now be dragged and dropped
from your desktop directly to the module. You can do multiple files at one time.
B. New Page Display and Scrolling: Once you click on an item to view it, the item
takes over the entire page and the left-hand menu is removed. Now the entire page
scrolls for greater usability of your content.
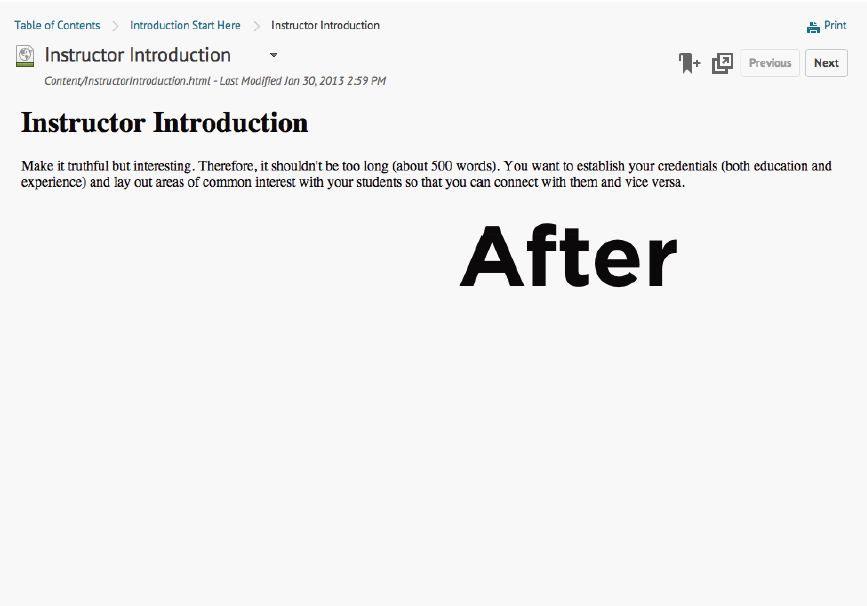
C. Document Viewing: Microsoft Word and PDF files can now be opened in your
browser without the need for downloading. However, you still have the option to
download files to your computer.
Highlights – Table of Contents
This tab displays all your course modules and content items. You can now add a
variety of items right in Content. Use the Table of Contents dropdown to access
the Manage Files and Course Builder tools. There is no View Content tab since
what you see and what the student sees will be the same in the Table of Contents
area.
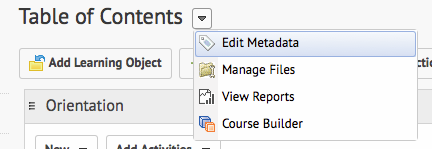
From the Table of Contents tab you can select Add Learning Object (LOR –
also see page 20). Copy Course Components takes you directly to the
Import/Export/Copy tool to allow you to copy something from another course
you belong to. See below for descriptions of the New and Add Activities
dropdown menus.
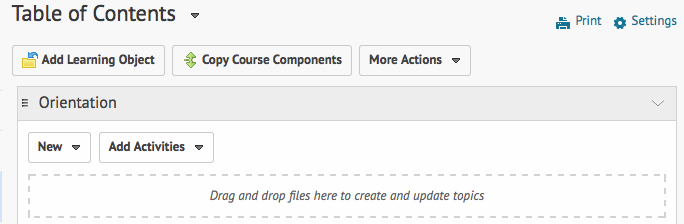
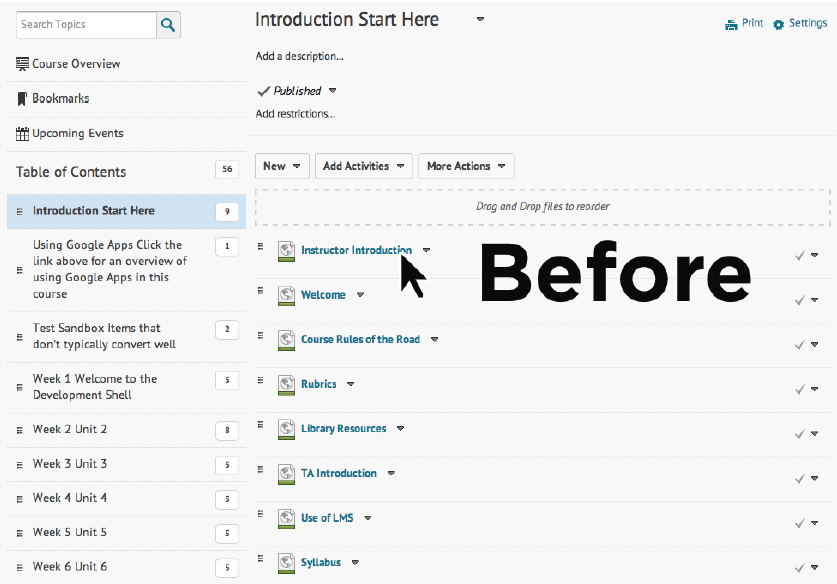
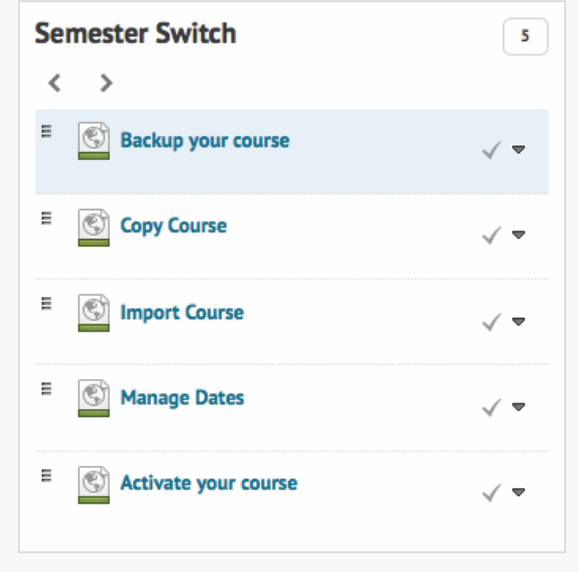
Along the left column you will see your modules listed along with the number of
items the module contains. Clicking on a module name will display a list of the items
in the module on the right.
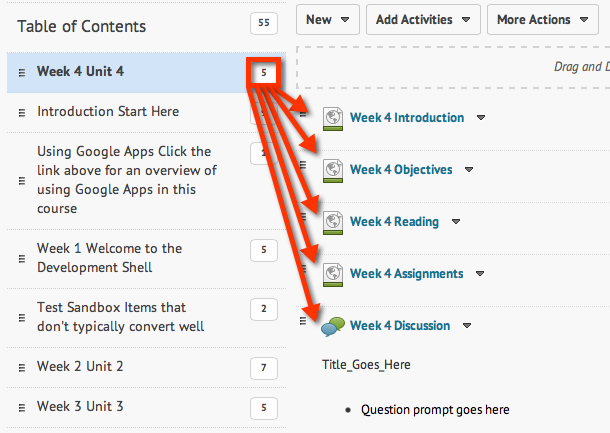
Clicking on the three-line icon on the left allows you to drag and drop the module in
another location in the Table of Contents. This works with items within the
module as well.
To create a new module you click Add a module button, which is found at the
bottom of the Table of Contents column on the left. It converts to a text box that lets
you type the module name in directly. The ability to Add a description gives you
the ability to create text and images at the module level.

A. New Module: On the right will appear a page which lets you set properties and add
items to the module. Click on the dropdown menus or the text such as Add a
description or Add restrictions to view more options.

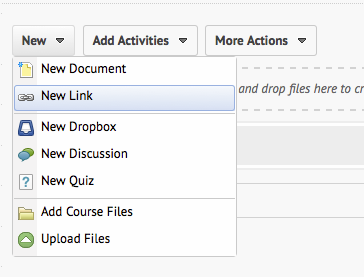
B. New Items: From the new dropdown you will still be able to upload files, add files
from the Manage Files tool, create a new HTML document or link. New in 10.1 is the
ability to create a new Dropbox, Quiz or Discussions directly from the content
area. You will give the new item a name and description and then be able to set
properties for it. There may be other properties you will need to set in the Dropbox,
Quiz, or Discussions as you did before in 10.0. New to this screen is the ability to
view student submissions and grades. Clicking the pencil icon next to any item title
allows you to edit the title directly on that page.
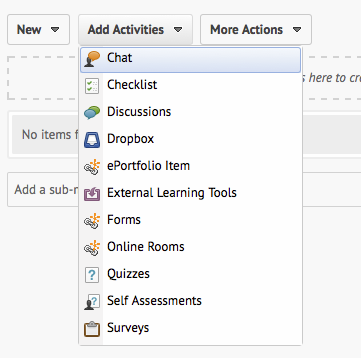
C. New Activities: It is now easier to Add Activities to your modules. Click the Add
Activities dropdown and select an item. A popup window allows you to choose an
activity to insert. If you have not already created the item, links allow you to create it
at this time. The exception is Forms to work with ePortfolio. You must create those
in the Forms tool.
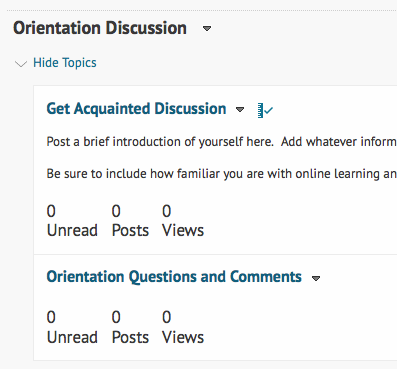
Highlights – Discussion
Discussions: Discussion display has been reorganized to make it easier to
distinguish a Forum from a Topic. Topics are now indented under the Forum and
display in a different color background. In the Classlist > View Progress, Discussions
for each student it now displays a count of posts authored and replied.
Highlights – Dropbox
Dropbox: The Dropbox has been enhanced to include multiple availability dates
including Start Date, Due Date, and End Date. This allows students to submit
assignments late if you setup an end date in advance.

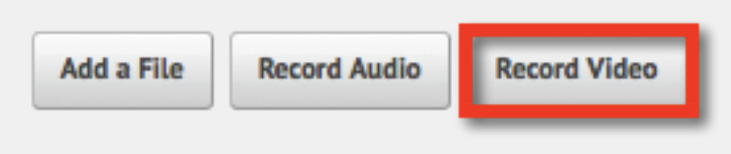
Highlights – Video Feedback
Video Feedback: In addition to recording audio feedback, you now have the
option to Record Video to leave student feedback.
Other
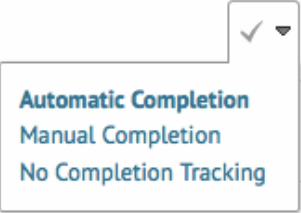
Automatic Completion: New in 10.1 is the ability to set Automatic Completion
tracking on items in your content. You can set automatic, manual or no. Reports are
available under User Progress. This determines which items have been visited by a
user. For some activities, automatic tracking requires users to participate in a chat or
discussion, submit a file or form, or complete an assessment such as a quiz or survey
before completion is successful.
Automatic Completion – Completion Status: New at the bottom of each page
is a list of the items in the current module and their completion status. Instructors
and students can click the progression arrows or the name of the content item to
progress to the next item.
User Progress: Similar to the new content area, user progress has been simplified
and reorganized in order to make it easier for instructors to track their student’s
progress within the course.
There are now two views: Class and User progress. Summaries are visible on one
page. Filters allow you to display data you choose.
From the Assessments menu, select User Progress. You will see a list of all users
and their progress with respect to Content, Objectives, Logins and Grades. On
the grades bar, hovering over each bar provides additional details for the grades.
Classlist: From the Classlist, select View Progress for a student. A summary
and nine progress indicators are used. Click a report name in the left menu to display
student data for that indicator. In the Settings menu you can choose which
indicators to display. When viewing Grades, hovering over each bar at the top
provides additional details for the grades.
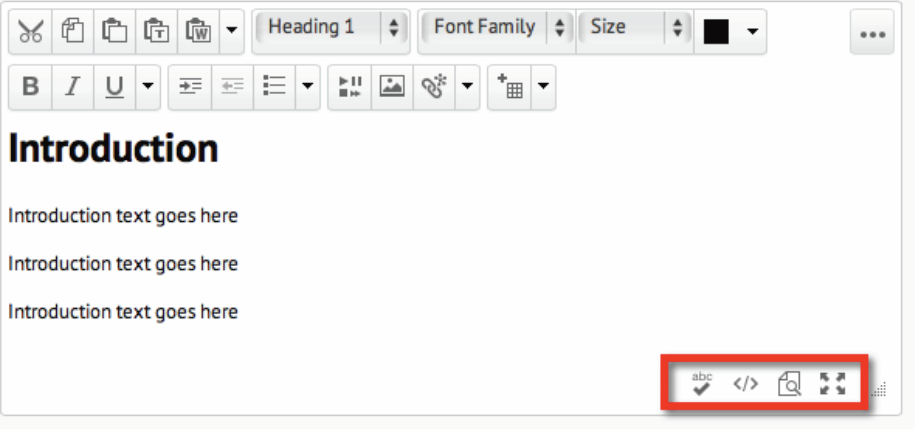
HTML Editor: The HTML editor looks different. The icons have moved and
dropdown menus offer more options. The sources icon and expand page are now on
the bottom right and look slightly different.
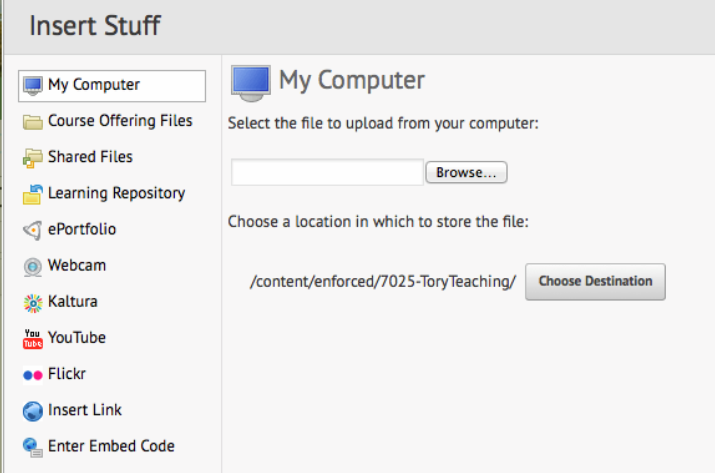
Insert Stuff: In the HTML editor the Insert Stuff option allows you to choose
Webcam. This allows you to use your computer’s webcam to create a video to
embed in the item you are creating.
Upcoming Events: Under the Content tab, these are created by the system. If you
have events connected to the calendar they display here under the Upcoming Events
tab. The Course Schedule tab will display any dates for available items or other
deadlines you have set on your content.
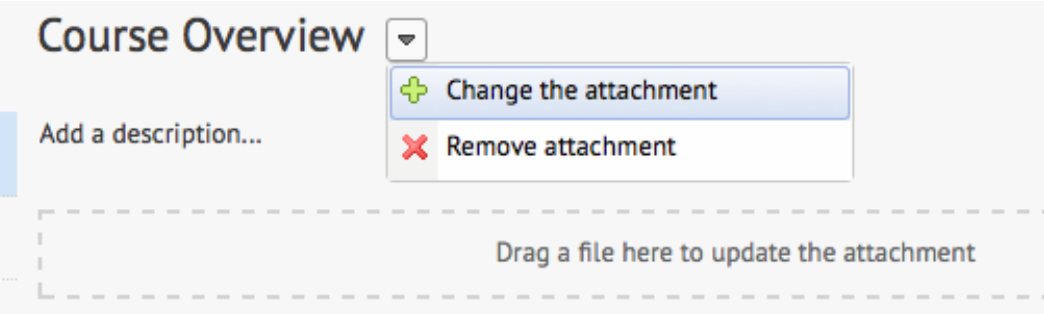
Course Overview: Under the Content tab, this is great for welcome materials,
orientations, syllabus and any other information you might put in a Getting Started
module. You can click Add a description to open an HTML editor. You can use the
Add an attachment from the dropdown menu or you can drag files from your
desktop and drop them in the box to add to your overview.
Breadcrumbs: When Breadcrumbs are also now available at the top of the page to
allow you to move around your content.
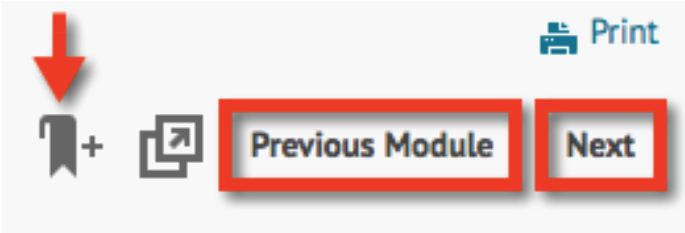
Bookmarks and Module Navigation: When a user creates a bookmark of a
course page, the list is kept under the Bookmarks tab on the Content page. You
can use Previous and Next to move through the module.
Admin Tools: You now have easy access to your Admin Tools on the minibar from
anywhere in the course. Click the widget icon to the right of your name in the right
corner of the minibar.

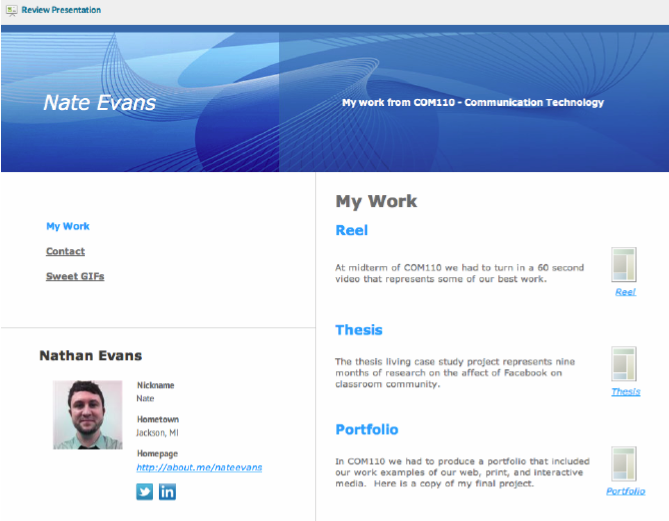
ePORTFOLIO
ePortfolio is a personal portfolio tool for storing, organizing, reflecting on and sharing
items that represent student learning. Students can include documents, graphics,
audio files, videos, presentations, course work and more to demonstrate
improvement or mastery in a certain area.
A personal notification dashboard lets the user set up instant notifications via SMS or
email on a mobile device to be connected to newsfeed updates.
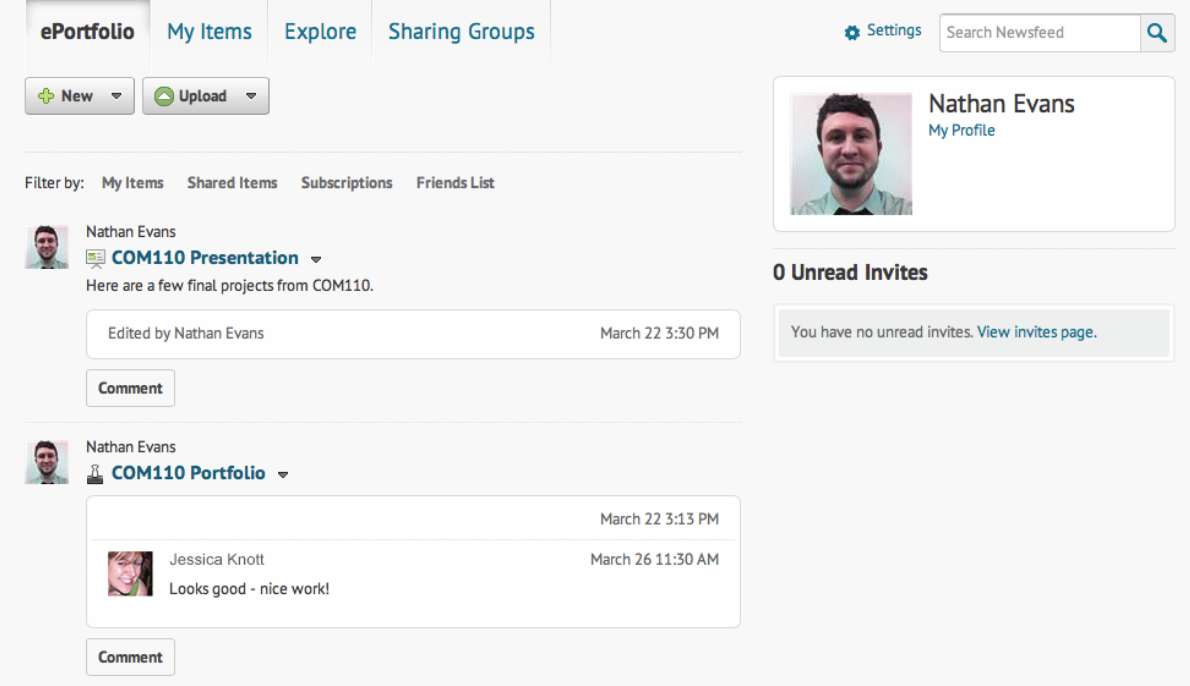
Students and faculty can decide what items to include in portfolios, how to organize
them, and whom you want to share them with. Peers, mentors, potential employers,
and others can be granted permission to view items, edit items, see or add
comments, and see or add assessments depending desired feedback.
ePortfolios provide a great way for students to create and share professional
presentations!
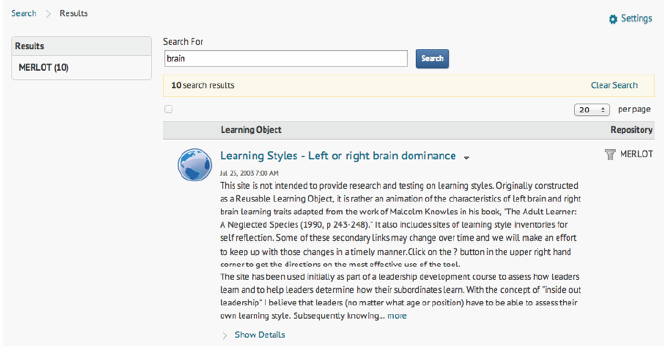
Learning Object Repository
A Learning Object Repository (LOR) is an online library for storing, managing, and
sharing your learning resources (learning objects) across multiple courses. For
example, a learning object might be an article, a quiz, a presentation, an image, a
video, or any other kind of document/file that you use to create course content and
learning materials for online learning.
The benefit is that, when you publish your learning objects to a Learning Object
Repository, you are able to classify and organize them, making them easily
searchable for others. For example, you can classify learning objects according to
defined learning standards or goals. You can also review, rate, and provide feedback
on learning objects to ensure high quality online resources. You can update your
resources in one location, but share them to many different places.
To have a LOR created, contact the Distance Learning Services Help Desk at:
1-800-500-1554.
Adobe Connect
Adobe Connect integration will be coming soon after the upgrade. Please check
back to help.d2l.msu.edu for the latest updates and feature information.

Kaltura Mediaspace
Kaltura Mediaspace integration will be coming soon after the upgrade. Please check
back to help.d2l.msu.edu for the latest updates and feature information.

http://mediaspace.msu.edu/